Installshield installation information manager
Author: c | 2025-04-24
InstallShield Installation Information Manager скачать бесплатно без смс. InstallShield Installation Information Manager 1.3. InstallShield Installation Information Manager скачать бесплатно без смс. InstallShield Installation Information Manager 1.3. Программа для управления архивом инсталляторов, создаваемым в поддиректории InstallShield Installation Information папки Program Files
InstallShield Installation Information Manager 1.3
AdminStudio 2022 R2 | 24.0 | Repackager One of the main reasons you use AdminStudio is to significantly reduce the time it takes to package an application for deployment. You can use the following procedure to speed up the packaging process even more. You can create an InstallShield Editor template that you can use within the Repackager interface to save additional time when customizing a package. By using this template, all future InstallShield Editor .ism project files generated by Repackager will contain the company-specific default settings that were specified in the template. Using a template is also beneficial for organizations with multiple packagers, since it helps enforce consistency by enabling all packagers to make the same standard customizations to packages. To create an InstallShield Editor template to use within Repackager, perform the following steps. To create a customized InstallShield Editor template: 1. Create a new Basic MSI Project in the InstallShield Editor. 2. On the Installation Designer tab, select the General Information node under Installation Information, and enter your company-specific information as required. 3. Under Behavior and Logic, select the Property Manager node and add the required properties like ALLUSERS, ISSCRIPTDRIVEN, etc. 4. You can also optionally set Shallow Folder Structure to Yes in the Releases view under Media. 5. After making all required changes, save the project as an InstallShield Editor Template (.ist) type. 6. This new template should now be available along with other project types in the InstallShield Editor. 7. From within the Repackager interface, you can start using this customized template by selecting the Use a customized template option in the Repackaged Output view, and selecting the InstallShield Editor template that you just created.
InstallShield Installation Information Manager .365
Replace Your Define.ini File (Caution: Advanced) If none of the previous three troubleshooting steps have resolved your issue, you can try a more aggressive approach (Note: Not recommended for amateur PC users) by downloading and replacing your appropriate Define.ini file version. We maintain a comprehensive database of 100% malware-free Define.ini files for every applicable version of CyberLink Media Suite. Please follow the steps below to download and properly replace you file: Locate your Windows operating system version in the list of below "Download Define.ini Files". Click the appropriate "Download Now" button and download your Windows file version. Copy this file to the appropriate CyberLink Media Suite folder location: Windows 10: C:\Program Files (x86)\InstallShield Installation Information\{729D20C8-FC13-4BE9-B0BB-E86F76600647}\ Windows 10: C:\Program Files (x86)\NSIS Uninstall Information\{729D20C8-FC13-4BE9-B0BB-E86F76600647}\ Windows 10: C:\Program Files (x86)\NSIS Uninstall Information\{C311A2C9-A8F9-408A-8386-B3118338754C}\ Windows 10: C:\Users\Tester\AppData\Local\Temp\RarSFX0\PerfectCam\ Windows 10: C:\Program Files (x86)\InstallShield Installation Information\{EE9EC028-49D2-4349-B0A3-9B2E752A4958}\ Show 36 more directories + Windows 10: C:\Program Files (x86)\NSIS Uninstall Information\{EE9EC028-49D2-4349-B0A3-9B2E752A4958}\ Windows 10: C:\Program Files (x86)\InstallShield Installation Information\{D7EACFE3-BC6A-48bb-B28C-4DBF318225E3}\ Windows 10: C:\Users\Tester\AppData\Local\Temp\RarSFX0\PP\ Windows 10: C:\Program Files (x86)\InstallShield Installation Information\{D36DD326-7280-11D8-97C8-000129760CBE}\ Windows 10: C:\Users\Tester\AppData\Local\Temp\RarSFX0\PhotoNow\ Windows 10: C:\Program Files (x86)\InstallShield Installation Information\{C59C179C-668D-49A9-B6EA-0121CCFC1243}\ Windows 10: C:\Program Files (x86)\InstallShield Installation Information\{B7E9FF81-662B-4A4A-A7FE-0F1B64B4A9DA}\ Windows 10: C:\Program Files (x86)\NSIS Uninstall Information\{B7E9FF81-662B-4A4A-A7FE-0F1B64B4A9DA}\ Windows 10: C:\Users\Tester\AppData\Local\Temp\RarSFX0\SRecorder\ Windows 10: C:\Program Files (x86)\InstallShield Installation Information\{ADD5DB49-72CF-11D8-9D75-000129760D75}\ Windows 10: C:\Program Files (x86)\InstallShield Installation Information\{90BB14DB-2494-40fe-AE58-4930B3CFB4BD}\ Windows 10: C:\Program Files (x86)\NSIS Uninstall Information\{90BB14DB-2494-40fe-AE58-4930B3CFB4BD}\ Windows 10: C:\Users\Tester\AppData\Local\Temp\RarSFX0\PhotoDirector9\ Windows 10: C:\Program Files (x86)\InstallShield Installation Information\{8FCCB703-3FBF-49e7-A43F-A81E27D9B07E}\ Windows 10: C:\Program Files (x86)\InstallShield Installation Information\{8F14AA37-5193-4A14-BD5B-BDF9B361AEF7}\ Windows 10: C:\Program Files (x86)\NSIS Uninstall Information\{8F14AA37-5193-4A14-BD5B-BDF9B361AEF7}\ Windows 10: C:\Program Files (x86)\InstallShield Installation Information\{8D149BE2-6542-4F6A-AEC4-7D61E6DCAEFB}\ Windows 10: C:\Program Files (x86)\NSIS Uninstall Information\{8D149BE2-6542-4F6A-AEC4-7D61E6DCAEFB}\ Windows 10: C:\Program Files (x86)\InstallShield Installation Information\{7A3F32E0-D8E1-40C1-8E1B-1F5693F2ADE0}\ Windows 10: C:\Program Files (x86)\NSIS Uninstall Information\{7A3F32E0-D8E1-40C1-8E1B-1F5693F2ADE0}\ Windows 10: C:\Program Files (x86)\InstallShield Installation Information\{324F76CC-D8DD-4D87-B77D-D4AF5E1AA7B3}\ Windows 10: C:\Program Files (x86)\NSIS Uninstall Information\{324F76CC-D8DD-4D87-B77D-D4AF5E1AA7B3}\ Windows 10: C:\Users\Tester\AppData\Local\Temp\RarSFX0\WVEditor\ Windows 10: C:\Program Files (x86)\InstallShield Installation Information\{1FBF6C24-C1fD-4101-A42B-0C564F9E8E79}\ Windows 10: C:\Program Files (x86)\NSIS Uninstall Information\{1FBF6C24-C1fD-4101-A42B-0C564F9E8E79}\ Windows 10: C:\Users\Tester\AppData\Local\Temp\RarSFX0\PStarter\ Windows 10: C:\Program Files (x86)\InstallShield Installation Information\{0F4F617F-E8D5-46A3-A0F9-43855182A3B1}\ Windows 10: C:\Program Files (x86)\NSIS Uninstall Information\{0F4F617F-E8D5-46A3-A0F9-43855182A3B1}\ Windows 10: C:\Program Files (x86)\InstallShield Installation Information\{0078CD4D-B146-4D77-8CF0-268B36C1A3EC}\ Windows 10: C:\Program Files (x86)\NSIS Uninstall Information\{0078CD4D-B146-4D77-8CF0-268B36C1A3EC}\ Windows 10: C:\Users\Tester\AppData\Local\Temp\RarSFX0\UCM\ Windows 10: C:\Program Files (x86)\InstallShield Installation Information\{5C6A88EF-7090-4B7A-A7C2-7AC51C27D2B5}\ Windows 10: C:\Program Files (x86)\NSIS Uninstall Information\{5C6A88EF-7090-4B7A-A7C2-7AC51C27D2B5}\ Windows 10: C:\Users\Tester\AppData\Local\Temp\RarSFX0\Preactivated Installshield Installation Information Manager
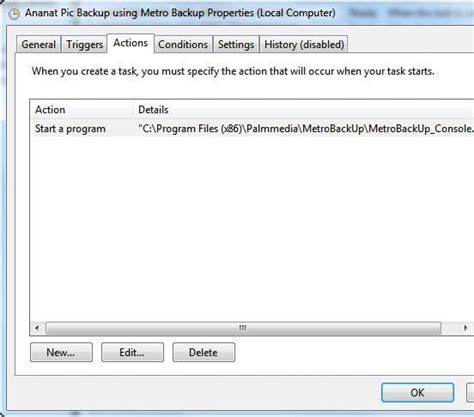
Most vendors provide either a single file, when downloaded from the web, or set of files, when distributed on a CD. Executing the installer file, typically named setup.exe, installs the vendor's application on any operating system. Vendors typically use one of three applications to create install packages: InstallShield, Windows Installer, or Wise Installer. Each of these applications provides a method for creating silent installs. When automating the installation of vendor install packages, you'll want to ensure the installation package does not pause for user input during installation. Silent Installs with InstallShield InstallShield has a record mode that captures answers to all dialog boxes in the installation procedure. InstallShield requires the recorded response iis file to be on the managed machine during the installation. To deploy, the agent procedure must use the writeFile() command to send both the setup.exe and record.iis files from VSA server to the managed machine and then use executeFile() to run setup.exe with the options /s /f"\record.iis". Refer to your InstallShield help guide for more information regarding the silent installation capability with a recorded response file. Create a custom install package by following these steps: Verify the install package was made with InstallShield. Launch the install package. Confirm InstallShield Wizard displays at the end of the window title bar. Launch the install package in record mode from a command prompt. If the install package is a single file - Run setup.exe /a /r /f1c:\temp\record.iss. Setup.exe is the name of the install package. c:\temp\record.iss is the full path filename to save the recorded output. If the Install package is a set of files - Run setup.exe /r /f1c:\temp\record.iss. Setup.exe is the name of the install package. c:\temp\record.iss is the full path filename to save the recorded output. Deploy the install package with the recorded dialog box responses. Use. InstallShield Installation Information Manager скачать бесплатно без смс. InstallShield Installation Information Manager 1.3.InstallShield Installation Information Manager - Softpedia
InstallShield. Cloud License Server (CLS) eliminate the time and effort required to set up and manage local License Servers, and provide the concurrent licenses to check out the license from multiple machines and easy to configure to build from DevOps build pipeline. Support of Windows Package Manager in Prerequisites InstallShield 2021 R1 introduces the Windows Package Manager tab as part of the InstallShield Prerequisite Editor. Windows Package Manager tab lets you specify the Windows Package Manager (WPM) package you want to install as a prerequisite to your product. Support of App Installer File for MSIX Updates Now, the MSIX updates can be Configured using App Installer file. Simple Modern Installers The Wizard Interface view has been enhanced by adding the Minimal Wizard Pages, which provide modern installation\uninstallation experience to end users using frameless wizard screens. Limitations The limitations to the Minimal Wizard Pages support in Suite project are: • Customization to Minimal Wizard Pages layout is not supported. Adding/Deleting of pages and controls are not allowed. • Specifying the actions for the button clicks on Minimal Wizard Pages are not supported. • Password protection for your installation is not currently supported. • Progress on the task bar during setup installation is not supported in this release. • Preview of Minimal Wizard Pages in InstallShield IDE is not supported on Windows 7. Support for Windows 11 The Setups created with InstallShield 2021 R1 can now run on Windows 11 version.Preactivated Installshield Installation Information Manager - 4shared
I just received my InstallShield Maintenance Fulfillment notice via email. I'd love to say more but it's time to go download the real thing.Press Release:New Version of InstallShield Helps Tackle Complexity in Installing Programming Rich Software Macrovision’s InstallShield 2008 Addresses New Installation Requirements For Windows Vista, Accelerating Product Time to Market SANTA CLARA, Calif.--(BUSINESS WIRE)--Macrovision Corporation (NASDAQ: MVSN) today announced the latest edition of its installation authoring solution for Windows, InstallShield 2008. The new edition of InstallShield is designed specifically to help developers easily package and deliver advanced Windows Vista-based software programs, helping customers experience a smooth and reliable installation process. It meets the latest Microsoft platform requirements. According to IDC, Windows Vista will be the fastest adopted version of Windows, with over 90 million copies of Windows Vista in place worldwide by the end of 20071. As developers ramp up software programming to meet demands from businesses eager to switch to Windows Vista, they will require a solution that will help them become more proficient in creating installation for their software programs. InstallShield 2008 features a new digital signing tab that eliminates the hassle of signing executable files individually. It also includes the ability to help validate Microsoft Software Installers (MSIs) as per the Certified for Windows Vista Logo program requirements. These and the other features included in InstallShield 2008 help simplify the complex process of creating effective installations for software programs in today’s digital economy. “With tools that help software vendors create setup MSIs that are compliant with the Certified for Windows Vista installation requirements, InstallShield 2008 gives software vendors confidence in targeting Windows Vista, by helping to accelerate and simplify the certification process,” said Tom Caputo, group product manager at Microsoft Corp. “Microsoft and Macrovision are continuously working together to help facilitate integration and compatibility, while maintaining ease of use.” “Macrovision’s InstallShield 2008 streamlines the process of making installers for Windows Vista,” said Ken Steltzner, software engineer at M-Audio, a business unit of Avid Technology, Inc. “The new digital signing feature lets you easily sign all files in the installer package in one place, right inside InstallShield 2008. This feature makes it easier for us to meet the new installer requirements in Windows Vista.” “For software providers to stay competitive installations have to work. There is no way around it. Software providers need to incorporate the latest installation advancements and ensure a reliable and intuitive experience installation experience,” said Corey Ferengul, senior vice president of product and solution management at Macrovision. “InstallShield 2008 enables companies to focus on developing their products by making it easier to rapidly deliver those new products on the latest Windows platforms.” InstallShield is an industry standard for authoring high-quality Windows Installer andInstallShield Installation Information Manager скачать бесплатно
Installation Instructions Overview The Zebra WMI providers are installed as part of the Zebra Scanner SDK Installshield package. There are two WMI providers: Scanner WMI provider; and, Driver WMI provider. Two Windows services (Symbol Scanner Management and RSM Driver Provider Service) are installed and start automatically. These two services are called Zebra's WMI provider, also called the WMI plug-in. For general installation instructions to install the Zebra Scanner SDK, refer to the installation instructions in the Scanner SDK for Windows Developer's Guide. NOTE The Zebra CoreScanner Driver is a prerequisite for the Zebra WMI provider. The Zebra Scanner SDK Installshield® package automatically installs the CoreScanner Driver if it is not already on the system. A complete installation of the SDK installs the Zebra WMI provider. If you select the custom installation, you must select the Scanner WMI provider and Driver WMI provider components. Basic Installation Verification You can perform a basic inspection on your system process list to verify a successful installation of the Zebra WMI provider. To do a simple check of the Zebra WMI provider's operation: Right click on the Windows Task Bar and select Task Manager. Select the process tag in Windows 7, or Details tab in Windows 10 and 11. Figure 1: Windows Task Manager - Scanner Figure 2: Windows Task Manager - Driver In the Image Name list, find RSMDriverProviderService.exe and ScannerService.exe. The presence of these two processes in the list indicates a successful installation. Configuration Scanner Configuration Bar Codes Scan the Set All Defaults. InstallShield Installation Information Manager скачать бесплатно без смс. InstallShield Installation Information Manager 1.3.Comments
AdminStudio 2022 R2 | 24.0 | Repackager One of the main reasons you use AdminStudio is to significantly reduce the time it takes to package an application for deployment. You can use the following procedure to speed up the packaging process even more. You can create an InstallShield Editor template that you can use within the Repackager interface to save additional time when customizing a package. By using this template, all future InstallShield Editor .ism project files generated by Repackager will contain the company-specific default settings that were specified in the template. Using a template is also beneficial for organizations with multiple packagers, since it helps enforce consistency by enabling all packagers to make the same standard customizations to packages. To create an InstallShield Editor template to use within Repackager, perform the following steps. To create a customized InstallShield Editor template: 1. Create a new Basic MSI Project in the InstallShield Editor. 2. On the Installation Designer tab, select the General Information node under Installation Information, and enter your company-specific information as required. 3. Under Behavior and Logic, select the Property Manager node and add the required properties like ALLUSERS, ISSCRIPTDRIVEN, etc. 4. You can also optionally set Shallow Folder Structure to Yes in the Releases view under Media. 5. After making all required changes, save the project as an InstallShield Editor Template (.ist) type. 6. This new template should now be available along with other project types in the InstallShield Editor. 7. From within the Repackager interface, you can start using this customized template by selecting the Use a customized template option in the Repackaged Output view, and selecting the InstallShield Editor template that you just created.
2025-04-13Replace Your Define.ini File (Caution: Advanced) If none of the previous three troubleshooting steps have resolved your issue, you can try a more aggressive approach (Note: Not recommended for amateur PC users) by downloading and replacing your appropriate Define.ini file version. We maintain a comprehensive database of 100% malware-free Define.ini files for every applicable version of CyberLink Media Suite. Please follow the steps below to download and properly replace you file: Locate your Windows operating system version in the list of below "Download Define.ini Files". Click the appropriate "Download Now" button and download your Windows file version. Copy this file to the appropriate CyberLink Media Suite folder location: Windows 10: C:\Program Files (x86)\InstallShield Installation Information\{729D20C8-FC13-4BE9-B0BB-E86F76600647}\ Windows 10: C:\Program Files (x86)\NSIS Uninstall Information\{729D20C8-FC13-4BE9-B0BB-E86F76600647}\ Windows 10: C:\Program Files (x86)\NSIS Uninstall Information\{C311A2C9-A8F9-408A-8386-B3118338754C}\ Windows 10: C:\Users\Tester\AppData\Local\Temp\RarSFX0\PerfectCam\ Windows 10: C:\Program Files (x86)\InstallShield Installation Information\{EE9EC028-49D2-4349-B0A3-9B2E752A4958}\ Show 36 more directories + Windows 10: C:\Program Files (x86)\NSIS Uninstall Information\{EE9EC028-49D2-4349-B0A3-9B2E752A4958}\ Windows 10: C:\Program Files (x86)\InstallShield Installation Information\{D7EACFE3-BC6A-48bb-B28C-4DBF318225E3}\ Windows 10: C:\Users\Tester\AppData\Local\Temp\RarSFX0\PP\ Windows 10: C:\Program Files (x86)\InstallShield Installation Information\{D36DD326-7280-11D8-97C8-000129760CBE}\ Windows 10: C:\Users\Tester\AppData\Local\Temp\RarSFX0\PhotoNow\ Windows 10: C:\Program Files (x86)\InstallShield Installation Information\{C59C179C-668D-49A9-B6EA-0121CCFC1243}\ Windows 10: C:\Program Files (x86)\InstallShield Installation Information\{B7E9FF81-662B-4A4A-A7FE-0F1B64B4A9DA}\ Windows 10: C:\Program Files (x86)\NSIS Uninstall Information\{B7E9FF81-662B-4A4A-A7FE-0F1B64B4A9DA}\ Windows 10: C:\Users\Tester\AppData\Local\Temp\RarSFX0\SRecorder\ Windows 10: C:\Program Files (x86)\InstallShield Installation Information\{ADD5DB49-72CF-11D8-9D75-000129760D75}\ Windows 10: C:\Program Files (x86)\InstallShield Installation Information\{90BB14DB-2494-40fe-AE58-4930B3CFB4BD}\ Windows 10: C:\Program Files (x86)\NSIS Uninstall Information\{90BB14DB-2494-40fe-AE58-4930B3CFB4BD}\ Windows 10: C:\Users\Tester\AppData\Local\Temp\RarSFX0\PhotoDirector9\ Windows 10: C:\Program Files (x86)\InstallShield Installation Information\{8FCCB703-3FBF-49e7-A43F-A81E27D9B07E}\ Windows 10: C:\Program Files (x86)\InstallShield Installation Information\{8F14AA37-5193-4A14-BD5B-BDF9B361AEF7}\ Windows 10: C:\Program Files (x86)\NSIS Uninstall Information\{8F14AA37-5193-4A14-BD5B-BDF9B361AEF7}\ Windows 10: C:\Program Files (x86)\InstallShield Installation Information\{8D149BE2-6542-4F6A-AEC4-7D61E6DCAEFB}\ Windows 10: C:\Program Files (x86)\NSIS Uninstall Information\{8D149BE2-6542-4F6A-AEC4-7D61E6DCAEFB}\ Windows 10: C:\Program Files (x86)\InstallShield Installation Information\{7A3F32E0-D8E1-40C1-8E1B-1F5693F2ADE0}\ Windows 10: C:\Program Files (x86)\NSIS Uninstall Information\{7A3F32E0-D8E1-40C1-8E1B-1F5693F2ADE0}\ Windows 10: C:\Program Files (x86)\InstallShield Installation Information\{324F76CC-D8DD-4D87-B77D-D4AF5E1AA7B3}\ Windows 10: C:\Program Files (x86)\NSIS Uninstall Information\{324F76CC-D8DD-4D87-B77D-D4AF5E1AA7B3}\ Windows 10: C:\Users\Tester\AppData\Local\Temp\RarSFX0\WVEditor\ Windows 10: C:\Program Files (x86)\InstallShield Installation Information\{1FBF6C24-C1fD-4101-A42B-0C564F9E8E79}\ Windows 10: C:\Program Files (x86)\NSIS Uninstall Information\{1FBF6C24-C1fD-4101-A42B-0C564F9E8E79}\ Windows 10: C:\Users\Tester\AppData\Local\Temp\RarSFX0\PStarter\ Windows 10: C:\Program Files (x86)\InstallShield Installation Information\{0F4F617F-E8D5-46A3-A0F9-43855182A3B1}\ Windows 10: C:\Program Files (x86)\NSIS Uninstall Information\{0F4F617F-E8D5-46A3-A0F9-43855182A3B1}\ Windows 10: C:\Program Files (x86)\InstallShield Installation Information\{0078CD4D-B146-4D77-8CF0-268B36C1A3EC}\ Windows 10: C:\Program Files (x86)\NSIS Uninstall Information\{0078CD4D-B146-4D77-8CF0-268B36C1A3EC}\ Windows 10: C:\Users\Tester\AppData\Local\Temp\RarSFX0\UCM\ Windows 10: C:\Program Files (x86)\InstallShield Installation Information\{5C6A88EF-7090-4B7A-A7C2-7AC51C27D2B5}\ Windows 10: C:\Program Files (x86)\NSIS Uninstall Information\{5C6A88EF-7090-4B7A-A7C2-7AC51C27D2B5}\ Windows 10: C:\Users\Tester\AppData\Local\Temp\RarSFX0\
2025-04-23InstallShield. Cloud License Server (CLS) eliminate the time and effort required to set up and manage local License Servers, and provide the concurrent licenses to check out the license from multiple machines and easy to configure to build from DevOps build pipeline. Support of Windows Package Manager in Prerequisites InstallShield 2021 R1 introduces the Windows Package Manager tab as part of the InstallShield Prerequisite Editor. Windows Package Manager tab lets you specify the Windows Package Manager (WPM) package you want to install as a prerequisite to your product. Support of App Installer File for MSIX Updates Now, the MSIX updates can be Configured using App Installer file. Simple Modern Installers The Wizard Interface view has been enhanced by adding the Minimal Wizard Pages, which provide modern installation\uninstallation experience to end users using frameless wizard screens. Limitations The limitations to the Minimal Wizard Pages support in Suite project are: • Customization to Minimal Wizard Pages layout is not supported. Adding/Deleting of pages and controls are not allowed. • Specifying the actions for the button clicks on Minimal Wizard Pages are not supported. • Password protection for your installation is not currently supported. • Progress on the task bar during setup installation is not supported in this release. • Preview of Minimal Wizard Pages in InstallShield IDE is not supported on Windows 7. Support for Windows 11 The Setups created with InstallShield 2021 R1 can now run on Windows 11 version.
2025-04-01I just received my InstallShield Maintenance Fulfillment notice via email. I'd love to say more but it's time to go download the real thing.Press Release:New Version of InstallShield Helps Tackle Complexity in Installing Programming Rich Software Macrovision’s InstallShield 2008 Addresses New Installation Requirements For Windows Vista, Accelerating Product Time to Market SANTA CLARA, Calif.--(BUSINESS WIRE)--Macrovision Corporation (NASDAQ: MVSN) today announced the latest edition of its installation authoring solution for Windows, InstallShield 2008. The new edition of InstallShield is designed specifically to help developers easily package and deliver advanced Windows Vista-based software programs, helping customers experience a smooth and reliable installation process. It meets the latest Microsoft platform requirements. According to IDC, Windows Vista will be the fastest adopted version of Windows, with over 90 million copies of Windows Vista in place worldwide by the end of 20071. As developers ramp up software programming to meet demands from businesses eager to switch to Windows Vista, they will require a solution that will help them become more proficient in creating installation for their software programs. InstallShield 2008 features a new digital signing tab that eliminates the hassle of signing executable files individually. It also includes the ability to help validate Microsoft Software Installers (MSIs) as per the Certified for Windows Vista Logo program requirements. These and the other features included in InstallShield 2008 help simplify the complex process of creating effective installations for software programs in today’s digital economy. “With tools that help software vendors create setup MSIs that are compliant with the Certified for Windows Vista installation requirements, InstallShield 2008 gives software vendors confidence in targeting Windows Vista, by helping to accelerate and simplify the certification process,” said Tom Caputo, group product manager at Microsoft Corp. “Microsoft and Macrovision are continuously working together to help facilitate integration and compatibility, while maintaining ease of use.” “Macrovision’s InstallShield 2008 streamlines the process of making installers for Windows Vista,” said Ken Steltzner, software engineer at M-Audio, a business unit of Avid Technology, Inc. “The new digital signing feature lets you easily sign all files in the installer package in one place, right inside InstallShield 2008. This feature makes it easier for us to meet the new installer requirements in Windows Vista.” “For software providers to stay competitive installations have to work. There is no way around it. Software providers need to incorporate the latest installation advancements and ensure a reliable and intuitive experience installation experience,” said Corey Ferengul, senior vice president of product and solution management at Macrovision. “InstallShield 2008 enables companies to focus on developing their products by making it easier to rapidly deliver those new products on the latest Windows platforms.” InstallShield is an industry standard for authoring high-quality Windows Installer and
2025-04-09OverviewScanSoft OmniPage SE 16 is a program developed by Nuance Communications. Upon installation and setup, it defines an auto-start registry entry which makes this program run on each Windows boot for all user logins. A scheduled task is added to Windows Task Scheduler in order to launch the program at various scheduled times (the schedule varies depending on the version). The software installer includes 11 files and is usually about 10.98 MB (11,512,320 bytes). In comparison to the total number of users, most PCs are running the OS Windows 7 (SP1) as well as Windows 10. While about 36% of users of ScanSoft OmniPage SE 16 come from the United States, it is also popular in Germany and Canada.Program detailsURL: www.nuance.comHelp link: support.nuance.comInstallation folder: C:\Program Files\scansoft\omnipage16\progguides\imagesUninstaller: MsiExec.exe /I{9F4EF688-774B-470C-A5A5-8E459C42D3EC}(The Windows Installer is used for the installation, maintenance, and removal.)Estimated size: 10.98 MBFiles installed by ScanSoft OmniPage SE 16isusweb.dll (by InstallShield Software) - InstallShield Update Service (InstallShield Update Service Web Agent)_isusres.dll (by InstallShield Software) - InstallShield Update Service Resource DLLagent.exe - InstallShield Update Service Agentdwusplay.exe - InstallShield Update Service Setup Playerisdm.exe - InstallShield Update Service Download Managerissch.exe - InstallShield Update Service Scheduler_ispmres.dll - InstallShield Update Manager (InstallShield Update Manager Resource DLL)dwusplay.dll - InstallShield Update Service Setup Player Moduleisuspm.exe - InstallShield Update Service Update Managerlogic.jsstarterlogic.jsBehaviors exhibited2 Scheduled Tasksisuspm.exe is scheduled as a task named 'InstallShield Software-online actualiseringsprogramma' (runs weekly on Mondays at 10:00).issch.exe is scheduled as a task named 'InstallShield software-updateservice' (runs weekly on Mondays at 10:00).2 Startup Files (User Run)issch.exe is loaded in the current user (HKCU) registry as an auto-starting executable named 'ISUSScheduler' and executes as "C:\Program Files\common files\installshield\updateservice\issch.exe" -start.isuspm.exe is loaded in the current user (HKCU) registry as an auto-starting executable named 'ISUSPM Startup' and executes as C:\Program Files1\COMMON~1\INSTAL~1\UPDATE~1\ISUSPM.exe -startup.2 Startup Files (All Users Run)issch.exe is loaded in the all users (HKLM) registry as a startup file name 'ISUSScheduler' which loads as "C:\Program Files\Common Files\InstallShield\UpdateService\issch.exe" -start.isuspm.exe is loaded in the all users (HKLM) registry as a startup file name 'ISUSPM Startup' which loads as "C:\Program Files\Common Files\InstallShield\UpdateService\isuspm.exe" -startup.Resource utilization averages issch.exeMemory:2.02 MB21.09 MB averageTotal CPU:0.0000292287%0.031193% averageKernel CPU:0.00000725%0.016088% averageUser CPU:0.00002198%0.015104% averageCPU cycles/sec:5,1108,062,084 averageI/O reads/min:29 Bytes435.61 KB averageisuspm.exeMemory:1.74 MBTotal CPU:0.0051947611%Kernel CPU:0.00155802%User CPU:0.00363674%How do I remove ScanSoft OmniPage SE 16?You can uninstall ScanSoft OmniPage SE 16 from your computer by using the Add/Remove Program feature in the Window's Control Panel.On the Start menu (for Windows 8, right-click the screen's bottom-left corner), click Control Panel, and then, under Programs, do one of the following:Windows Vista/7/8/10: Click Uninstall a Program.Windows XP: Click Add or Remove Programs.When you find the program ScanSoft OmniPage SE 16, click it, and then do one of the following:Windows Vista/7/8/10: Click Uninstall.Windows XP: Click the Remove or Change/Remove tab (to the
2025-04-22